How to set up Auto Indexing with Bing Using Webmaster Tools API key
Set up Auto Indexing on Bing with Indexly. Get Your Website Crawled Immediately by Google, and appear in the search engines when you publish a new page or a post.

Setting up auto-indexing for Bing using Indexly is easier than you might think. If you’ve ever wondered how to get your new web pages indexed quickly, this guide is for you. By using the Bing Webmaster Tools API key, Indexly can automatically notify Bing whenever you publish fresh content, helping your pages appear in search results much faster.
Key Takeaways
- The Bing Webmaster Tools API key is essential for enabling auto-indexing with Indexly.
- Verifying your website ownership on Bing is the first step in the process.
- You can generate the API key through the API Access section in Bing Webmaster Tools.
- Indexly uses the API key to automatically submit new pages for Bing indexing.
- Auto-indexing improves your site's visibility and reduces the time it takes for new content to appear in search results.
Step 1 - Create an account
Go ahead and sign up for an Indexly account. You can do so by browsing the signup page https://indexly.ai/login and clicking on Login with Google. Indexly will automatically sync all your websites from Google Search Console to your account.
Step 2 - Enable your sites
Once you have successfully logged in to your account, you should see a full list of all Domain Properties and URL Properties that you can access within your Google Search Console account. You will also notice the permissions your account has to these sites, As long as you have either Full User or Owner permission you can use the site with Indexly.
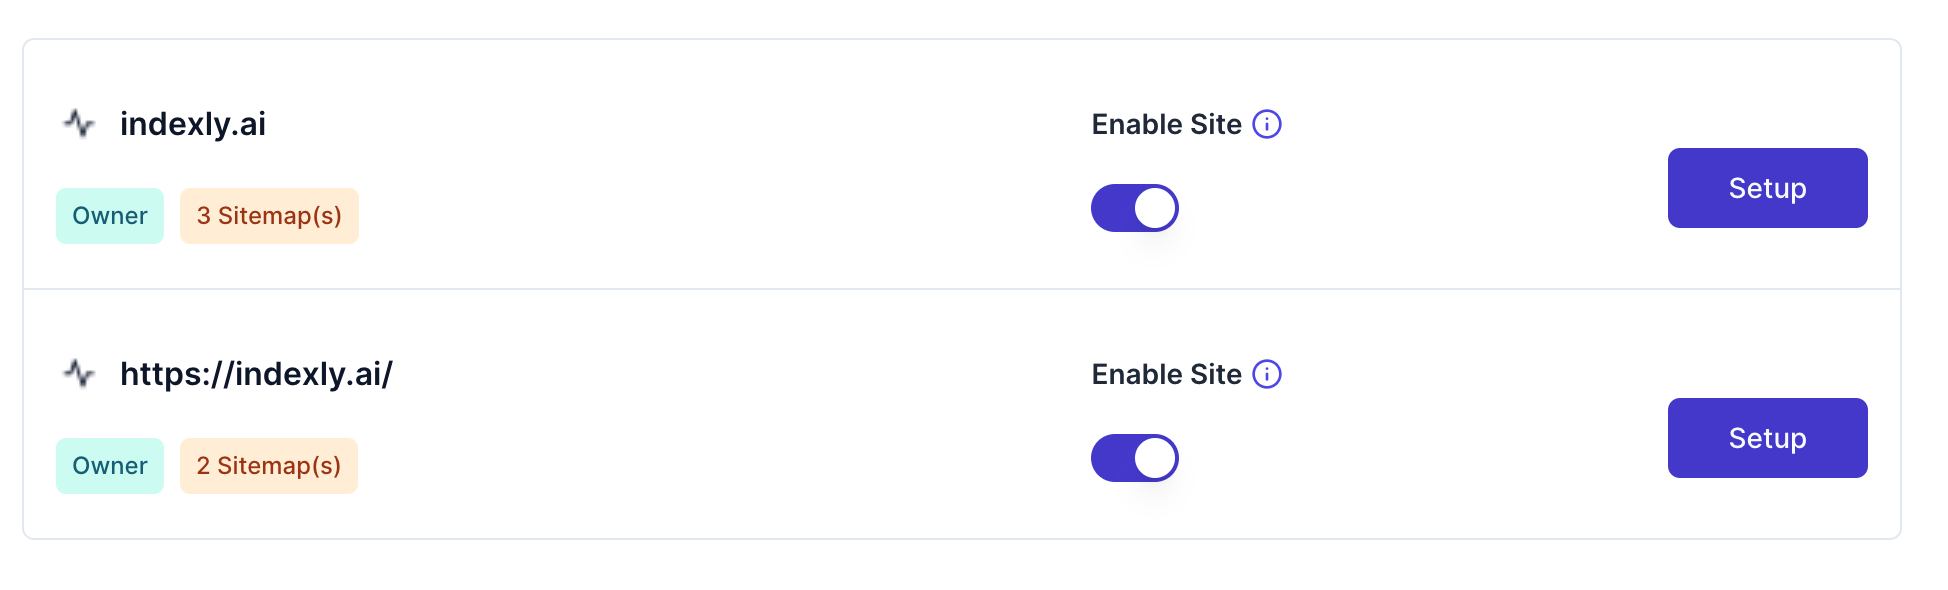
Toggle the Switch next to your site to enable it on Indexly. As you can see in the above screenshot, we have enabled the Indexly domain property. You will observe, that Indexly syncs your sitemaps. This is to confirm all your sitemaps from the Google Search Console have been pulled in.
Step 3 - Generating Your Bing Webmaster Tools API Key
Navigating to API Access in Bing Webmaster
To get started, log in to your Bing Webmaster account. Once inside, look for the Settings option in the top-right corner of the dashboard. From there, navigate to the section labeled API Access. This is where you'll manage and generate your API key for connecting with tools like Indexly.
Steps to Generate the API Key
Generating the API key is simple. Just follow these steps:
- Click on API Access under the Settings menu.
- Select the option labeled Generate API Key.
- Confirm your action, and Bing Webmaster will provide you with a unique API key.
Make sure to copy this key and store it in a secure location. You'll need it to connect Indexly to Bing.
Best Practices for Securing Your API Key
Your API key is like a password—it grants access to sensitive data and functionality. Here are a few tips to keep it safe:
- Do not share your API key with anyone you don’t trust.
- Store it in a secure location, such as a password manager.
- If you suspect your API key has been compromised, regenerate it immediately through the Bing Webmaster dashboard.
Setting up your API key properly ensures a smooth integration with Indexly, making the indexing process faster and more efficient.
Step 4 - Authorize Indexly to index pages on Bing
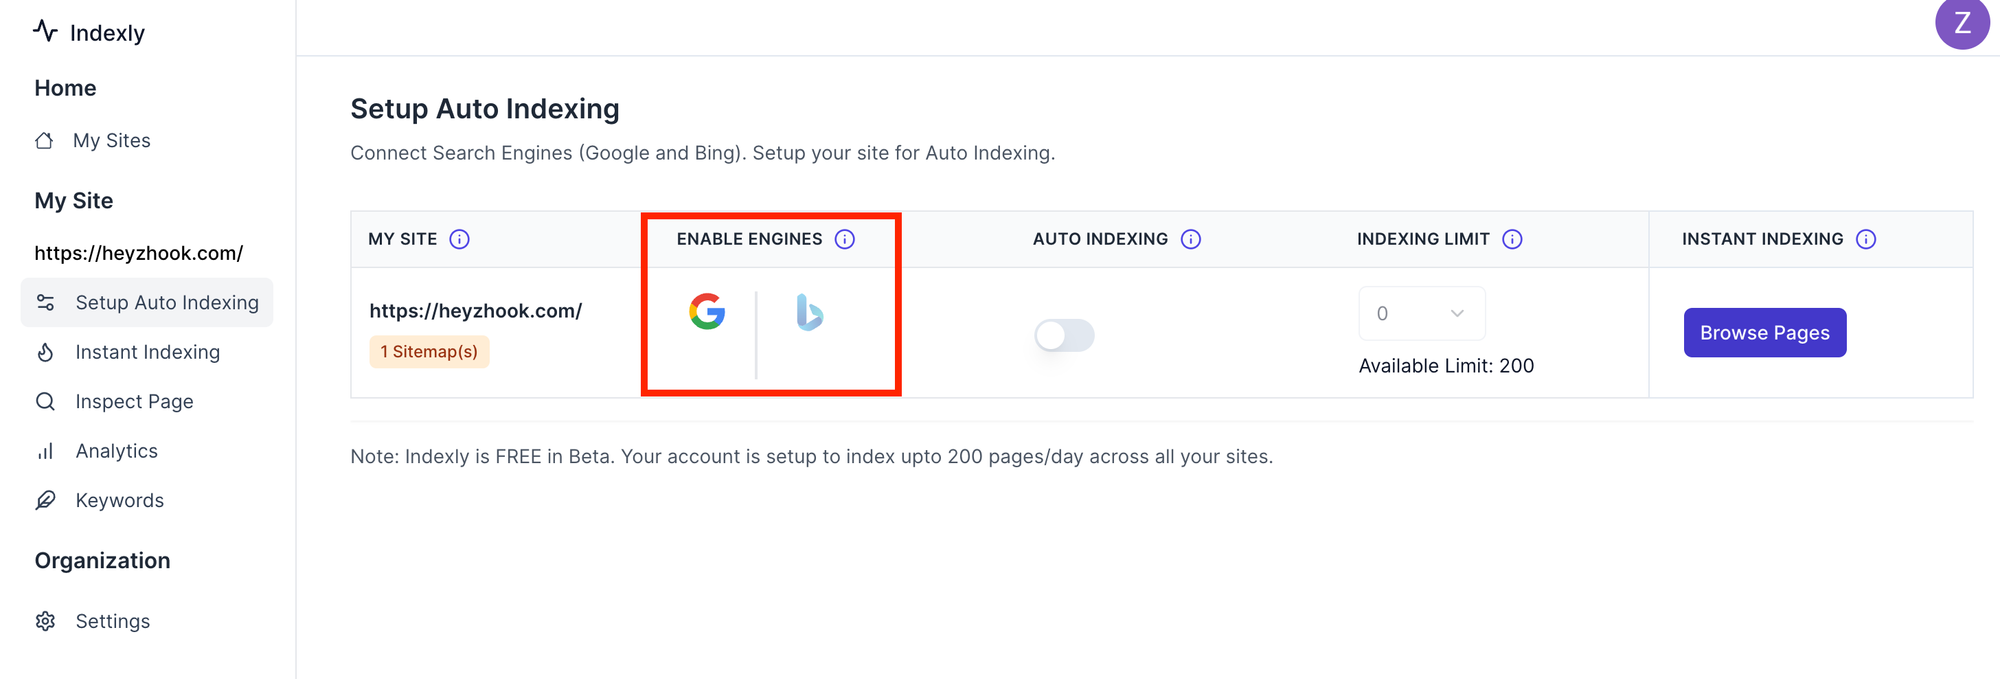
In the Setup screen, under the Setup Search Engines section, click on the Bing icon.
Once you click on the Bing logo, you shall see a popup detailing the steps you need to take to verify your site with Indexly. You can see the steps in the below screenshot.
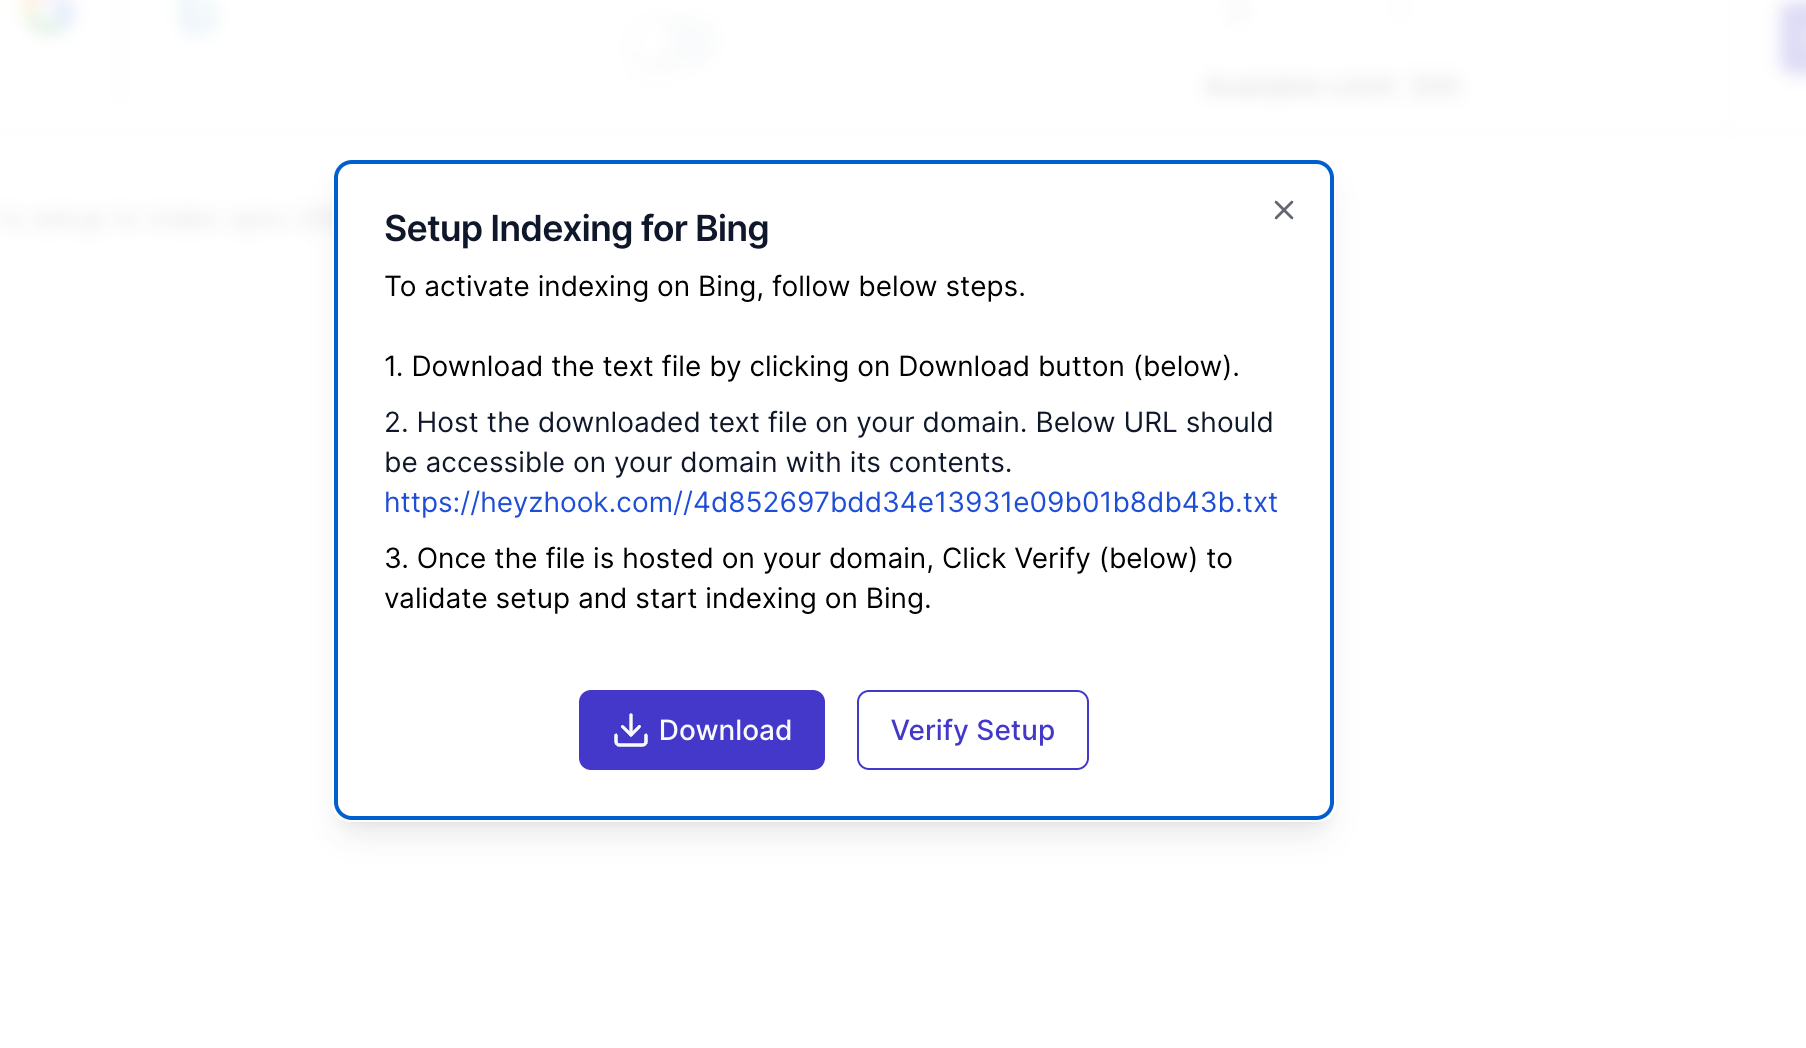
Here are the steps you need to follow -
- To verify your site with Indexly you need to host a text file on your domain, in this example, the file is "4d852697bdd34e13931e09b01b8db43b.txt". You can download this file by clicking on the Download button.
- You need to host this file on the root of your domain. For example, in Wordpress you can SFTP to your Wordpress instance and copy the file to the root folder where Wordpress is hosted. Please follow similar instructions for other hosting platforms.
- Once done, click on the Verify Setup button. Indexly will check if the URL [https://yourdomain.com/4d852697bdd34e13931e09b01b8db43b.txt] works and that the content of the file is 4d852697bdd34e13931e09b01b8db43b.
Step 5 - You are now set for Auto Indexing
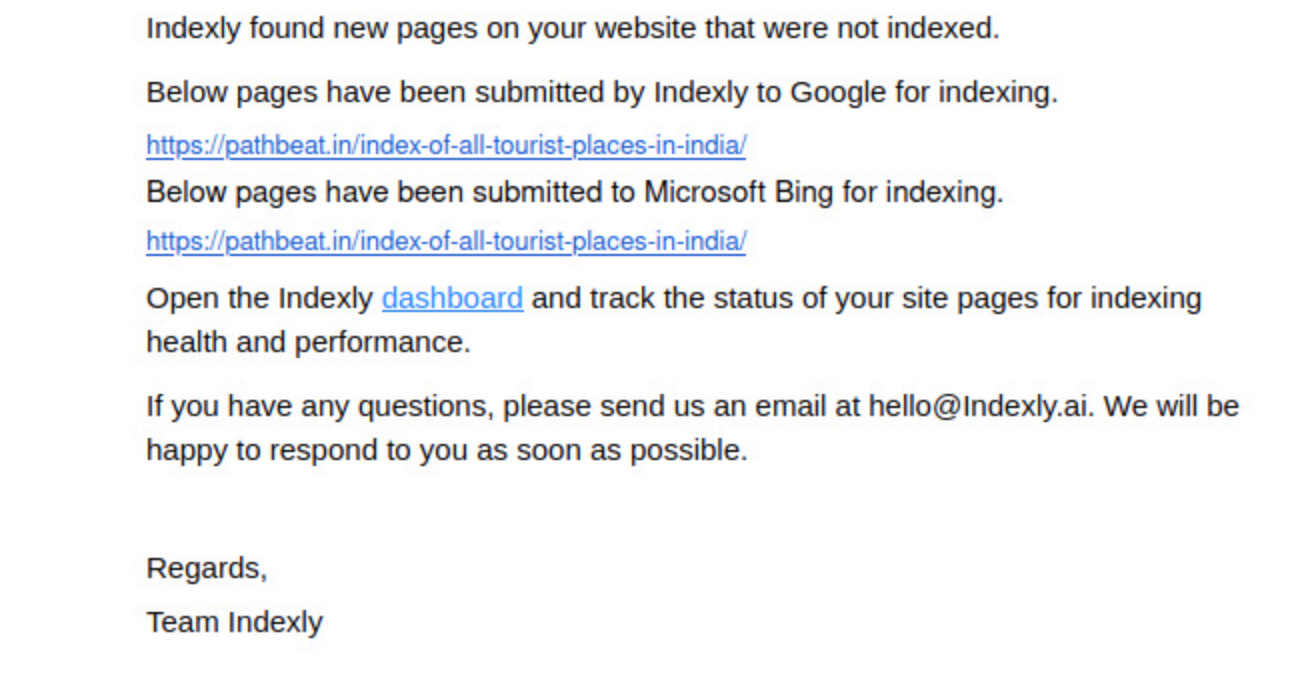
Every time you publish a new page on your site, your sitemap will get updated. Indexly automatically checks your sitemaps, finds new pages, and submits them to Bing, thereby reducing human effort/errors and time to get indexed.
Here's what the email notification looks like when a new webpage is discovered and submitted for indexing by Indexly.
Step 6 - You are done!
Great job! You've successfully enabled your site (s) for auto-indexing. It typically takes up to 24 hours for the pages to be indexed. All of these steps usually take less than 5 minutes, so go ahead and get indexing 😃
Enhancing Your SEO Strategy with Bing and Indexly
Leveraging Bing Insights for Better Rankings
Bing isn't just another search engine; it offers a treasure trove of insights that can help you understand how your site performs. With tools like Bing Webmaster, you can analyze traffic sources, keyword performance, and even user behavior. These insights make it easier to adjust your content strategy and target the right audience. The key is to use this data to refine your approach and boost your rankings.
Using Indexly to Automate SEO Tasks
SEO takes time, and let’s face it—manually handling tasks like submitting pages for indexing can get tedious. Indexly simplifies this by automating the process. Once your site is connected, Indexly can automatically submit new or updated pages to Bing, saving you hours of manual effort. Here’s what it can handle:
- Auto-indexing new pages as soon as they’re published.
- Keeping track of changes to your sitemap.
- Reducing the time it takes for Bing to crawl and index your pages.
Improving Organic Traffic Through Faster Indexing
When it comes to search engine rankings, speed matters. The faster your pages are indexed, the sooner they can appear in search results. With Indexly, pages typically get indexed within 24-48 hours on Bing. This means more visibility, quicker traffic, and ultimately, better results for your SEO efforts.
Faster indexing doesn’t just help with visibility—it also gives you an edge over competitors who might still be waiting for their pages to show up in search results.
By combining Bing’s insights with Indexly’s automation, you’re not just optimizing your site—you’re setting it up for long-term success. For a detailed guide on how to effectively index your website on Bing using Indexly, check out our step-by-step instructions.
Wrapping It Up
Setting up auto indexing in Indexly with Bing using the Webmaster Tools API key might seem like a lot at first, but once you break it down, it’s pretty straightforward. From verifying your site to generating the API key and validating it in Indexly, every step plays a part in making sure your content gets indexed faster. And the best part? It saves you time and effort in the long run. So, if you’re looking to improve your site’s visibility on Bing, this is definitely worth doing. Give it a shot and see how it works for you!
Frequently Asked Questions
What is the Bing Webmaster Tools API Key?
The Bing Webmaster Tools API Key is a unique code that lets you connect your website to Bing's tools for managing and monitoring your site's performance.
Why is using the API key important for indexing?
The API key allows tools like Indexly to automatically submit your site updates to Bing, speeding up the indexing process and improving your site's visibility.
How do I verify my website on Bing Webmaster?
You can verify your website by logging into Bing Webmaster, adding your site, and following the verification steps using a meta tag, file upload, or DNS record.
What are the steps to generate an API key in Bing Webmaster?
Log in to Bing Webmaster, go to 'Settings,' select 'API Access,' and click 'Generate API Key' to create your unique key.
How does Indexly use the API key for auto-indexing?
Indexly uses the API key to communicate with Bing, automatically submitting new or updated pages for indexing as soon as they are published.
What should I do if my API key validation fails in Indexly?
Check if the API key is entered correctly, ensure your site is verified in Bing Webmaster, and confirm that your Indexly account has the necessary permissions.


